Quantcast
Channel: Benjr.tw
Viewing all 930 articles
Browse latest View live

NiceHash

$
0
0

挖礦大概要準備 比特幣錢包 & 挖礦程式 ,挖礦可以簡單區分為這幾種.

  1. 個人挖礦 – 個人使用自己的硬體設定來進行挖礦,依據目前狀況不太可能挖到了.
  2. 礦池 – 加入團體大家一起來挖礦,挖到時毎個人依計算力 (Hash Rate) 的貢獻是分礦,但通常礦池管理者會再抽成.
  3. 出售運算能力 – 把自己設備的算力(Hash Rate) 租用給別人,通常是透過第三方的仲介商如 Nicehash ,採用的是固定收益方式.

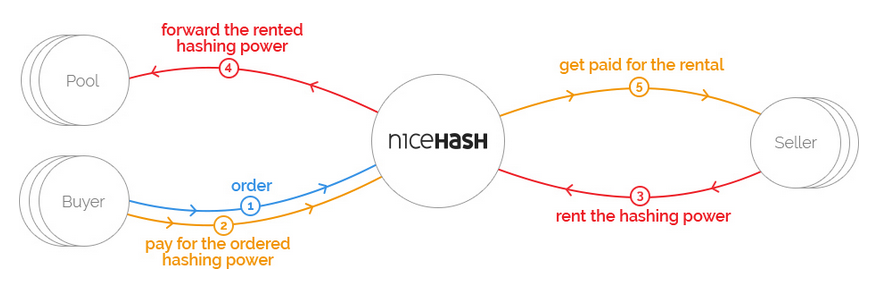
這邊討論如何透過出售運算能力來賺比特幣,先來看看 Nicehash 的運作模式.

圖片出自於 https://www.nicehash.com/help/how-does-nicehash-work

簡單的來說就是出租你的算力給想要挖礦的人來使用,賺的就是固定收益(給付比特幣).

目前程式有兩個版本
1. NiceHash Miner Legacy (1.x) – https://github.com/nicehash/NiceHashMinerLegacy/releases
2. NiceHash Miner 2 (2.x)- https://miner.nicehash.com/

NiceHash 官方網站並沒有特別列出 GPU 的支援列表,不過在執行時可以觀察到背景是執行 CCMiner 這一支程式,使用的是 Cuda SDK 8.0 版本.如果要支援最新的 Cuda 9 ,官方建議直接使用 ccminer – http://ccminer.org/ ,最新版有支援到 CUDA 9.0 ,同時支援 Windows 與 Linux 版本.

關於 Nvidia 載驅動程式(含 CUDA Toolkit) 支援列表可以參考 http://www.nvidia.com/download/driverResults.aspx/124729/en-us

Tesla 支援列表:

  • V-Series:
    Tesla V100 (CUDA Toolkit 9.0)
  • P-Series:
    Tesla P100, Tesla P40, Tesla P6, Tesla P4 (CUDA Toolkit 8.0 , 9.0)
  • K-Series:
    Tesla K80, Tesla K40c, Tesla K40m, Tesla K40s, Tesla K40st, Tesla K40t, Tesla K20Xm, Tesla K20m, Tesla K20s, Tesla K20c, Tesla K10, Tesla K8 (CUDA Toolkit 7.0 , 7.5 , 8.0 , 9.0)
  • C-Class:
    Tesla C2075, Tesla C2070, Tesla C2050 (CUDA Toolkit 7.0 , 7.5 , 8.0 , 9.0)
  • M-Class:
    M60, M40 24GB, M40, M6, M4, M2090, M2075, M2070, M2070-Q, M2050 (CUDA Toolkit 8.0 , 9.0)
  • X-Class:
    Tesla X2070, Tesla X2090 (CUDA Toolkit 7.0 , 7.5 , 8.0 , 9.0)

如果使用 CCMiner 一樣可以使用 NiceHash 只需要將伺服器設定到 NiceHash 即可 https://www.nicehash.com/help/which-stratum-servers-are-available


CCminer

$
0
0

CCminer 是一隻挖礦程式 (新版 Nvidia 支援到 CUDA 9.0),官方網頁 http://ccminer.org/ ,同時有支援 Windows 與 Linux 版本.

Windows 的平台直接下載後就可以使用,使用方式也很簡單.

目前這一支工具所支援的演算法如下:

  • bastion – use to mine Joincoin
  • bitcore – use to mine Bitcore’s Timetravel10
  • blake – use to mine Saffroncoin (Blake256)
  • blakecoin – use to mine Old Blake 256
  • blake2s – use to mine Nevacoin (Blake2-S 256)
  • bmw – use to mine Midnight
  • cryptolight – use to mine AEON cryptonight (MEM/2)
  • cryptonight – use to mine XMR cryptonight
  • c11/flax – use to mine Chaincoin and Flax
  • decred – use to mine Decred 180 bytes Blake256-14
  • deep – use to mine Deepcoin
  • dmd-gr – use to mine Diamond-Groestl
  • equihash – use to mine ZEC, HUSH and KMD
  • fresh – use to mine Freshcoin
  • fugue256 – use to mine Fuguecoin
  • groestl – use to mine Groestlcoin
  • heavy – use to mine Heavycoin
  • hsr – use to mine Hshare
  • jackpot – use to mine Sweepcoin
  • keccak – use to mine Maxcoin
  • lbry – use to mine LBRY Credits
  • luffa – use to mine Joincoin
  • lyra2 – use to mine CryptoCoin
  • lyra2v2 – use to mine Vertcoin
  • lyra2z – use to mine Zerocoin (XZC)
  • mjollnir – use to mine Mjollnircoin
  • myr-gr – use to mine Myriad-Groest
  • neoscrypt – use to mine FeatherCoin
  • nist5 – use to mine TalkCoin
  • penta – use to mine Joincoin / Pentablake
  • phi – use to mine LUXCoin
  • quark – use to mine Quarkcoin
  • qubit – use to mine Qubit
  • scrypt – use to mine Scrypt coins
  • scrypt:N – use to mine Scrypt-N (:10 for 2048 iterations)
  • scrypt-jane – use to mine Chacha coins like Cache and Ultracoin
  • s3 – use to mine 1coin (ONE)
  • sha256t – use to mine OneCoin (OC)
  • sia – use to mine SIA
  • sib – use to mine Sibcoin
  • skein – use to mine Skeincoin
  • skein2 – use to mine Woodcoin
  • skunk – use to mine Signatum
  • timetravel – use to mine MachineCoin
  • tribus – use to mine Denarius
  • x11evo – use to mine Revolver
  • x11 – use to mine DarkCoin
  • x14 – use to mine X14Coin
  • x15 – use to mine Halcyon
  • x17 – use to mine X17
  • vanilla – use to mine Vanilla (Blake256)
  • veltor – use to mine VeltorCoin
  • whirlpool – use to mine Joincoin
  • wildkeccak – use to mine Boolberry (Stratum only)
  • zr5 – use to mine ZiftrCoin

NiceHash

我要使用的平台為 NiceHash(出租算力),要先知道 stratum+tcp 與你自己的 user ID 為何?

  • stratum+tcp : 可以直接參考 NiceHash 官方網站說明 https://www.nicehash.com/help/which-stratum-servers-are-available
  • User ID : 就是登入 NiceHash 網站後在 Dashboard https://www.nicehash.com/dashboard ,所看到的 你的BTC挖矿和存款地址.
# ccminer -a scrypt:10 -o stratum+tcp://stratum.nicehash.com:3335 -u 3EujYFcoBzWvpUEvbe3obEG95mBuU88QBD -p x

參數說明:
-a, –algo=ALGO
-o, –url=URL
-u, –user=USERNAME
-p, –pass=PASSWORD (NiceHash 需要輸入 x)

Nicehash 只有支援 CCminer 部分演算法,建議可以直接使用 NiceHash 所提供的工具,請參考 http://benjr.tw/98693 ,好處是他會在執行時幫我們選擇適合的演算法,但每一種演算法的計價方式不同,請參考 https://www.nicehash.com/algorithm

AntPool

AntPool 支援的礦池可以參考 https://www.antpool.com/support.htm#help_2

下面的範例挖比特幣.

/ccminer -o stratum+tcp://stratum.antpool.com:3333 -u benwork1.001 -p soul123456

設定 Windows Server 2016 的無線網路

$
0
0

很奇怪的 Windows Server 2016 的無線網路,找到裝置切卻找不到工具可以設定.需要透過 Windows PowerShell SE 來開啟.

檢查目前無線網路服務的狀態

PS C:\Users\Administrator> Get-WindowsFeature *Wireless*

Install State 應該是 Available

安裝無線網路服務

PS C:\Users\Administrator> Install-WindowsFeature -Name Wireless-Networking

檢查已安裝無線網路服務的狀態

PS C:\Users\Administrator> Get-WindowsFeature *Wireless*

Install State 應該是 Installed

雖然已經安裝,但 需重啟才能完成裝安程序.

PS C:\Users\Administrator> Install-WindowsFeature -Name Wireless-Networking

Restart Needed 狀態顯示為 Yes

啟動服務

PS C:\Users\Administrator> net start WlanSvc

在裝置管理員會看到裝置已正常運作,在工具列也會看到 無線網路工具已安裝.

Linux command – nvidia-smi

$
0
0

一般 GPU 可以透過 TechPowerUp GPU-Z https://www.techpowerup.com/download/techpowerup-gpu-z/ 是查看資料,如果是 Nvidia 可以透過 nvidia-smi 指令.

測試版本為 CUDA Toolkit 8.0 ,Linux 安裝請參考 http://benjr.tw/98666

要怎麼確認你的 Nvidia GPU 運作正常,可以先透過 lspci 檢視裝置是否正確顯示.

root@benben:~# lspci | grep -i nvidia
86:00.0 3D controller: NVIDIA Corporation Device 15f8 (rev a1)

接著透過 Nvidia 所提供的 nvidia-smi(NVIDIA System Management Interface)工具檢查驅動程式與 GPU 的資訊.

root@benben:~# nvidia-smi 
Wed Nov  8 09:44:55 2017       
+-----------------------------------------------------------------------------+
| NVIDIA-SMI 384.90                 Driver Version: 384.90                    |
|-------------------------------+----------------------+----------------------+
| GPU  Name        Persistence-M| Bus-Id        Disp.A | Volatile Uncorr. ECC |
| Fan  Temp  Perf  Pwr:Usage/Cap|         Memory-Usage | GPU-Util  Compute M. |
|===============================+======================+======================|
|   0  Tesla P100-PCIE...  Off  | 00000000:86:00.0 Off |                    0 |
| N/A   37C    P0    33W / 250W |      0MiB / 16276MiB |      0%      Default |
+-------------------------------+----------------------+----------------------+
                                                                               
+-----------------------------------------------------------------------------+
| Processes:                                                       GPU Memory |
|  GPU       PID   Type   Process name                             Usage      |
|=============================================================================|
|  No running processes found                                                 |
+-----------------------------------------------------------------------------+

常用參數

  • -L, –list-gpus
    列出系統裡所有的 NVDIA GPUs.
  • -q, –query
    把系統的 GPU unit 所有資訊顯示出來.
  • -d, –display
    把系統的 GPU 部分資訊 (MEMORY , UTILIZATION , ECC , TEMPERATURE, POWER , CLOCK, COMPUTE , PIDS , PERFORMANCE , SUPPORTED_CLOCKS, PAGE_RETIREMENT , ACCOUNTING, ENCODER) 顯示出來.
  • –query-gpu
    如果需要詳細的資訊可以使用 –query-gpu ,至於要顯示哪一些詳細的資訊,可以先用參數 –help-query-gpu 查詢.

-d CLOCK

root@benben:~# nvidia-smi -q –d CLOCK
GPU 0000:63:00.0
Clocks
        Graphics                    : 875 MHz
        SM                          : 875 MHz
        Memory                      : 2505 MHz
    Applications Clocks
        Graphics                    : 875 MHz
        Memory                      : 2505 MHz
    Default Applications Clocks
        Graphics                    : 562 MHz
        Memory                      : 2505 MHz
    Max Clocks
        Graphics                    : 875 MHz
        SM                          : 875 MHz
        Memory                      : 2505 MHz
    SM Clock Samples
        Duration                    : 3730.56 sec
        Number of Samples           : 8
        Max                         : 875 MHz
        Min                         : 324 MHz
        Avg                         : 873 MHz
    Memory Clock Samples
        Duration                    : 344.77 sec
        Number of Samples           : 12
        Max                         : 715 MHz
        Min                         : 715 MHz
        Avg                         : 715 MHz
    Clock Policy
        Auto Boost                  : N/A
        Auto Boost Default          : N/A

其他與 Clock 相關參數.

  • -ac , –applications-clocks= Specifies – clocks as a pair (e.g. 2000,800) that defines GPU’s speed in MHz while running applications on a GPU.
  • –q –d SUPPORTED_CLOCKS – Set one of supported clocks
  • –auto-boost-default=ENABLED -i 0 – Enable boosting GPU clocks (K80 and later)
  • nvidia-smi –rac – Reset clocks back to base

-d POWER

root@benben:~# nvidia-smi -q –d POWER

與 power 相關參數使用.

  • nvidia-smi –pl N – Set power cap (maximum wattage the GPU will use)
  • nvidia-smi -pm 1 – Enable persistence mode
  • nvidia-smi stats -i -d -pwrDraw – Command that provides continuous monitoring of detail stats such as power

–query-gpu

root@benben:~# nvidia-smi --format=csv --query-gpu=utilization.gpu,power.draw,temperature.gpu 
utilization.gpu [%], power.draw [W], temperature.gpu
0 %, 33.17 W, 37

要長時間觀察可以加入 -l SEC (每 # 秒顯示一次)

root@benben:~# nvidia-smi -l 5 --format=csv --query-gpu=utilization.gpu,power.draw,temperature.gpu 

-l SEC
每 # 秒顯示一次.

Linux – tftp remap

$
0
0

在 tftp 設定裡面有一項是 tftpd.remap ,這是做什麼?
在 Windows 系統下沒有分大小寫,而且路徑表示方式也與 Linux 不同,我們可以透過 tftp remap 的功能.將一些參數作轉換後再傳送給 tftp.

測試環境為 Ubuntu 16.04 x86_64.

root@ubuntu:~# apt-get install tftp tftpd-hpa

確認一下這個本版的 tftp 有支援 remap.

root@ubuntu:~# /usr/sbin/in.tftpd -V
tftp-hpa 5.2, with remap, with tcpwrappers

tftp 設定檔

設定檔位於 /etc/default/tftpd-hpa ,預設是沒有啟動 remap 功能,需要自行新增 -m .

root@ubuntu:~# vi /etc/default/tftpd-hpa
# /etc/default/tftpd-hpa
TFTP_USERNAME="tftp"
TFTP_DIRECTORY="/var/lib/tftpboot"
TFTP_ADDRESS=":69"
TFTP_OPTIONS="--secure -vvv -m /var/lib/tftpboot/tftpd.map"

–secure, -s : Change root directory on startup.
–verbose, -v : Increase the logging verbosity of tftpd
–mapfile , -m remap-file : Specify the use of filename remapping.

tftp 預設目錄為 /var/lib/tftpboot.啟動服務的腳本檔則存放在 /etc/init/tftpd-hpa.conf

root@ubuntu:~# systemctl restart tftpd-hpa
root@ubuntu:~# systemctl status tftpd-hpa
● tftpd-hpa.service - LSB: HPA's tftp server
   Loaded: loaded (/etc/init.d/tftpd-hpa; bad; vendor preset: enabled)
   Active: active (running) since Thu 2017-11-23 23:33:34 PST; 31min ago
     Docs: man:systemd-sysv-generator(8)
  Process: 2972 ExecStop=/etc/init.d/tftpd-hpa stop (code=exited, status=0/SUCCESS)
  Process: 2986 ExecStart=/etc/init.d/tftpd-hpa start (code=exited, status=0/SUCCESS)
   CGroup: /system.slice/tftpd-hpa.service
           └─3001 /usr/sbin/in.tftpd --listen --user tftp --address :69 --secure -vvv -m /var/lib/tftpboot/tftp
root@ubuntu:~# pstree | grep -i tftp
        |-in.tftpd
root@ubuntu:~# netstat -a | grep tftp
udp        0      0 *:tftp                  *:*                                
udp6       0      0 [::]:tftp               [::]:*  

remap 設定檔

root@ubuntu:~# vi /var/lib/tftpboot/tftpd.map
rg \\ /
rg ([A-Z]) \L\1

參數說明:

  • r – Replace the substring matched by regex by the replacement pattern.
  • g – Repeat this rule until it no longer matches. This is always used with r.
    用 rg 來表示所有的資料都需要修改.
  • \\ – Literal backslash.
  • \L – Turns all subsequent letters to lower case.
  • \1 to \9 – The strings matched by each of the first nine parenthesized subexpressions, \( … \), of the regex pattern.
rg \\ /

在 Linux 下路徑的表示方式為 /var/lib/tftpboot 但是 windows 的路徑表示為 \User\ben ,\\ / 就是要把 \ 換成 /.

rg ([A-Z]) \L\1

表示把 A-Z 的所有字元都換成小寫 a-z.

測試 tftp remap

建立一個檔案 test ,但是我們透過 tftp 時,卻使用大寫,不過一樣可以得到檔案,因為背後有 tftp remap 在運作.

root@ubuntu:~# touch /var/lib/tftpboot/test 
root@ubuntu:~# tftp 172.16.15.130
tftp> get TEST
Received 30 bytes in 0.0 seconds
tftp> q
root@ubuntu:~# ll TEST
-rw-r--r-- 1 root root 28 Nov 24 00:07 TEST
root@ubuntu:~# cat /var/log/syslog
Nov 24 00:07:24 ubuntu in.tftpd[3126]: remap: input: TEST
Nov 24 00:07:24 ubuntu in.tftpd[3126]: remap: rule 1: rewrite: tEST
Nov 24 00:07:24 ubuntu in.tftpd[3126]: remap: rule 1: rewrite: teST
Nov 24 00:07:24 ubuntu in.tftpd[3126]: remap: rule 1: rewrite: tesT
Nov 24 00:07:24 ubuntu in.tftpd[3126]: remap: rule 1: rewrite: test
Nov 24 00:07:24 ubuntu in.tftpd[3126]: remap: done
Nov 24 00:07:24 ubuntu in.tftpd[3126]: RRQ from 172.16.15.130 filename TEST remapped to test

EDKII HTTP Boot

$
0
0

什麼是 HTTP Boot? 官方網站說明 https://github.com/tianocore/tianocore.github.io/wiki/HTTP-Boot
裡面有提到 UEFI , EDK II 以及 HTTP Boot 先來了解一下.

  • UEFI
    Extensible Firmware Interface (EFI) 的功能就類似傳統 BIOS ,他是 OS 與硬體之間溝通介面. 不過相較於傳統的 BIOS EFI 他的架構更模組化,功能更強大.EFI 的架構是由 Intel 提出的, 目前是交由 Unified EFI Forum 來管理.也就是我們現在所稱的 Unified Extensible Firmware Interface (UEFI)
  • EDK II
    EDK II is a modern, feature-rich, cross-platform firmware development environment for the UEFI and Platform Initialization(PI) specifications.
    EDK II is open source, using a BSD(FreeBSD) license.
    EDK II is a development code base for creating UEFI drivers, applications and firmware images.
  • HTTP Boot
    傳統的網卡 ROM 裡面存放了一些基本的網路協定如: Internet Protocol (IP), User Datagram Protocol (UDP), Dynamic Host Configuration Protocol (DHCP) 以及 Trivial File Transfer Protocol (TFTP) 透過這一些協定使得網卡在系統開機後就可以直接進行網路存取,進一步取得開機檔案與程序,這就是所謂的 PXE .
    新的 iPXE 就支援比較多的開機模式,可以從 web server via HTTP , iSCSI SAN , Fibre Channel SAN via FCoE , AoE SAN , wireless network , wide-area network , infiniband network.
    iPXE 可以直接把它燒錄到 網卡 ROM 內,或是透過一般的 PXE ROM 開機,但後續的工作環境透過 iPXE 來運作並搭配他的 Script + command line 命令列指令來操作.

    EDK II 有支援從 HTTP Boot 開機的選項,同時支援 IPv4 與 IPv6 的環境.

設定參考文件: https://github.com/tianocore-docs/Docs/raw/master/White_Papers/EDKIIHttpBootGettingStartedGuide_0_8.pdf

EDK II HTTP Boot 需要下列服務 DHCP (v4 或 v6) , DNS , Web Server .

  1. HTTP Boot 測試所需服務都架設在 CentOS 6.8 x68_64 ( IPv4: 192.6.1.1/24 , IPv6: 3ffe:501:ffff:100::1/64 )
  2. 還需要有一台有支援 HTTP Boot 開機的系統.

設定 DHCPv4

[root@localhost ~]# vi /etc/dhcp/dhcpd.conf 
#ddns-update-style interim;
ddns-update-style none;
ignore client-updates;
 
allow booting;
allow bootp;

subnet 192.6.1.0 netmask 255.255.255.0 {
        range 192.6.1.50 192.6.1.250;
        option broadcast-address 192.6.1.255;
        option subnet-mask 255.255.255.0;
        option vendor-class-identifier “HTTPClient”;
        option bootfile-name “http://192.6.1.1/EFI/Shell.efi”;
}

DHCP v4 設定需注意的地方如下,開機檔案請依據實際位置設定.

  1. option vendor-class-identifier “HTTPClient”;
  2. bootfile-name “http://192.6.1.1/EFI/Shell.efi”;

設定 DHCPv6

[root@localhost ~]# vi /etc/dhcp/dhcpd6.conf
default-lease-time 600;
max-lease-time 7200;
log-facility local7;
option dhcp6.vendor-class code 16 = {integer 32, integer 16, string};
subnet6 3ffe:501:ffff:100::1/64 {
        range6 3ffe:501:ffff:100::100 3ffe:501:ffff:100::200
        option dhcp6.vendor-class 0 0 “HTTPClient”;
        option dhcp6.bootfile-url “http://3ffe:501:ffff:100::1/EFI/Shell.efi”;
}

DHCP v6 設定需注意的地方如下,開機檔案請依據實際位置設定.

  1. option dhcp6.vendor-class 0 0 “HTTPClient”;
  2. option dhcp6.bootfile-url “http://3ffe:501:ffff:100::1/EFI/Shell.efi”;

DNS

如果你跟我一樣只有使用到 IP ,DNS 為非必要.

Web Server (Apache)

RHEL 預設的 Web Server 為 Apache,須確認服務已開啟.

[root@localhost ~]# service httpd status
httpd (pid 3688) is running...

整合 PXE 環境

可能你的環境已經有舊的 Legacy PXE ,我們可以把 UEFI PXE, HTTP Boot 都整合在同一台伺服器.只需要修改 DHCP 的設定即可.

  • DHCP IPv4
    [root@localhost ~]# cat /etc/dhcp/dhcpd.conf 
    #ddns-update-style interim;
    ddns-update-style none;
    ignore client-updates;
     
    allow booting;
    allow bootp;
    
    subnet 192.6.1.0 netmask 255.255.255.0 {
            range 192.6.1.50 192.6.1.250;
            option broadcast-address 192.6.1.255;
            option subnet-mask 255.255.255.0;
     
            if option arch = 00:010 {
               option vendor-class-identifier “HTTPClient”;
               option bootfile-name “http://192.6.1.1/EFI/Shell.efi”;
            } else {
                next-server 192.6.1.1;
                filename "linux-install/pxelinux.0";
            }
    }
    

    重點就是 if option arch = 00:010 ,如果 PXE Client 是透過 x64 uefi boot from http ( Architecture Type : 0x00:0x10 ) 就使用 Shell.efi 為開機檔案,要不然就是採傳統的開機 pxelinux.0 .

    關於 DHCP 支援的 Architecture Type.詳細請參考 整合性的 PXE 環境設定 http://benjr.tw/16194 說明.

  • DHCP IPv6
    [root@localhost ~]# cat /etc/dhcp/dhcpd6.conf
    default-lease-time 600;
    max-lease-time 7200;
    log-facility local7;
    option dhcp6.vendor-class code 16 = {integer 32, integer 16, string};
    subnet6 3ffe:501:ffff:100::1/64 {
    range6 3ffe:501:ffff:100::100 3ffe:501:ffff:100::200
    
            if option dhcp6.arch-type = 00:010 {
            option dhcp6.vendor-class 0 0 “HTTPClient”;
            option dhcp6.bootfile-url “http://3ffe:501:ffff:100::1/EFI/Shell.efi”;
            } else  {
            option dhcp6.bootfile-url “http://3ffe:501:ffff:100::1/EFI/grub64.efi”;
            }
    }
    

    重點就是 if option dhcp6.arch-type = 00:010 ,如果 PXE Client 是透過 x64 uefi boot from http ( Architecture Type : 0x00:0x10 ) 就使用 Shell.efi 為開機檔案,要不然就是採 UEFI 的開機檔 grub64.efi .

Windows – net use

$
0
0

大概很少機會會用到指令,目前也只有透過 Linux PXE 開啟 WinPE 時會用到.

測試環境為 Windows 7

Net Use Command Syntax

net use [{DeviceName | *}] [\\ComputerName\ShareName[\volume]] [{Password | *}]] [/user:[DomainName\]UserName] [/user:[DottedDomainName\]UserName] [/user: [UserName@DottedDomainName] [/savecred] [/smartcard] [{/delete | /persistent:{yes | no}}]

簡單範例如下

  • 建立網路磁碟機
    C:\Users\ben>net use u: \\10.32.76.216\image
    

    如需帳號密碼時則需要使用參數 /user

    C:\Users\ben>net use u: \\10.32.76.216\image /user:ben password
    命令已經成功完成。
    
  • 移除網路磁碟機
    如果由資料或是資料夾還在使用中,就會詢問是否需要強制結束網路磁碟機.
    C:\Users\ben>net use u: /delete
    在與 u: 的連線中,正在搜尋開啟檔案或不完整的目錄,不過一直沒有結果,持續擱置中。
    
    要繼續中斷連線並強制結束? (Y/N) [N]:
    
    C:\Users\ben>net use u: /delete
    u: 已經刪除。
    
  • 常見的問題
    網路磁碟資料夾需要完整路徑 \\10.32.76.216\image
    C:\Users\ben>net use u: \\10.10.32.76.216
    系統發生 53 錯誤。
    
    找不到網路路徑。
    

    輸入錯誤的網路磁碟代號.

    C:\Users\ben>net use o: /delete
    找不到網路連線。
    
    詳細資料,請輸入 NET HELPMSG 2250。
    

LMbench Memory 測試 – par_mem

$
0
0

LMbench 是用來測試系統效能的工具.關於安裝與測試種類請參考 http://benjr.tw/98076

測試環境為 Ubuntu 16.04 x86_64 (VMware 虛擬機) ,這邊來討論 LMBench 有關於 Memory 記憶體的測試項目.

安裝完成的 LMbench 程式目錄位於 /usr/lib/lmbench/bin/x86_64-linux-gnu/

root@ubuntu:~# cd /usr/lib/lmbench/bin/x86_64-linux-gnu/

par_mem

測試記憶體系統可以並行 (parallelism) 執行多少個請求.

Usage: par_mem [ -L <line size> ] [ -M <len> ] [ -W <warmups> ] [ -N <repetitions> ]
  • -L : ??
  • -M : ??
  • -W : 等待時間,單位??
  • -N : 重覆測試次數.
root@ubuntu:/usr/lib/lmbench/bin/x86_64-linux-gnu# ./par_mem
0.004096 8.19
0.008192 7.89
0.016384 8.34
0.032768 9.00
0.065536 7.07
0.131072 6.38
0.262144 6.32
0.524288 5.77
1.048576 5.30
2.097152 5.33
4.194304 8.66
8.388608 6.74
16.777216 5.77
33.554432 5.98
67.108864 4.94

測試輸出格式為: array size (單位大小為 M, 內容為 floating point value) & latency (單位為 nano-seconds)


Linux command – ss (Socket Statistics)

$
0
0

以前會用 netstat – http://benjr.tw/22383 來監控網路連線狀態,這邊介紹另外一隻功能相似,功能更強的 新工具 ss (Socket Statistics).

測試環境為 CentOS 7 x86_64.

# ss [options] [ FILTER ]

直接來看一下 man ss 提供的範例.

Display all TCP sockets.

[root@localhost ~]$ ss -t -a
State      Recv-Q Send-Q    Local Address:Port                     Peer Address:Port                
LISTEN     0      128                   *:sunrpc                              *:*                    
LISTEN     0      5         192.168.122.1:domain                              *:*                    
LISTEN     0      128                   *:ssh                                 *:*                    
LISTEN     0      128           127.0.0.1:ipp                                 *:*                    
ESTAB      0      0         172.16.15.132:ssh                       172.16.15.1:51647                
LISTEN     0      128                  :::sunrpc                             :::*                    
LISTEN     0      128                  :::ssh                                :::*                    
LISTEN     0      128                 ::1:ipp                                :::*  

參數:

  • -t, –tcp
    Display TCP sockets.
  • -a, –all
    Display both listening and non-listening (for TCP this means established connections) sockets.

Display all TCP sockets with process SELinux security contexts.

[root@localhost ~]$ ss -t -a -Z
State      Recv-Q Send-Q    Local Address:Port                     Peer Address:Port                
LISTEN     0      128                   *:sunrpc                              *:*                     users:(("systemd",pid=1,proc_ctx=system_u:system_r:init_t:s0,fd=47))
LISTEN     0      5         192.168.122.1:domain                              *:*                     users:(("dnsmasq",pid=1462,proc_ctx=system_u:system_r:dnsmasq_t:s0-s0:c0.c1023,fd=6))
LISTEN     0      128                   *:ssh                                 *:*                     users:(("sshd",pid=1057,proc_ctx=system_u:system_r:sshd_t:s0-s0:c0.c1023,fd=3))
LISTEN     0      128           127.0.0.1:ipp                                 *:*                     users:(("cupsd",pid=1059,proc_ctx=system_u:system_r:cupsd_t:s0-s0:c0.c1023,fd=12))
ESTAB      0      0         172.16.15.132:ssh                       172.16.15.1:51647                 users:(("sshd",pid=2617,proc_ctx=unconfined_u:unconfined_r:unconfined_t:s0-s0:c0.c1023,fd=3))
LISTEN     0      128                  :::sunrpc                             :::*                     users:(("systemd",pid=1,proc_ctx=system_u:system_r:init_t:s0,fd=46))
LISTEN     0      128                  :::ssh                                :::*                     users:(("sshd",pid=1057,proc_ctx=system_u:system_r:sshd_t:s0-s0:c0.c1023,fd=4))
LISTEN     0      128                 ::1:ipp                                :::*                     users:(("cupsd",pid=1059,proc_ctx=system_u:system_r:cupsd_t:s0-s0:c0.c1023,fd=11))
  • -Z, –context
    As the -p option but also shows process security context.

Display all UDP sockets.

[root@localhost ~]$ ss -u -a
State      Recv-Q Send-Q    Local Address:Port                     Peer Address:Port                
UNCONN     0      0         192.168.122.1:domain                              *:*                    
UNCONN     0      0              *%virbr0:bootps                              *:*                    
UNCONN     0      0                     *:bootpc                              *:*                    
UNCONN     0      0                     *:43723                               *:*                    
UNCONN     0      0                     *:mdns                                *:*                    
UNCONN     0      0             127.0.0.1:323                                 *:*                    
UNCONN     0      0                     *:34670                               *:*                    
UNCONN     0      0                    :::26308                              :::*                    
UNCONN     0      0                   ::1:323                                :::*   
  • -u, –udp
    Display UDP sockets.

Display all established ssh connections.

[root@localhost ~]$ ss -o state established dport = :ssh
Netid  Recv-Q Send-Q      Local Address:Port                       Peer Address:Port                
[root@localhost ~]$ ss -o state established sport = :ssh
Netid  Recv-Q Send-Q      Local Address:Port                       Peer Address:Port                
tcp    0      0           172.16.15.132:ssh                         172.16.15.1:51647                 timer:(keepalive,93min,0)

List all the tcp sockets in state FIN-WAIT

[root@localhost ~]$ ss -o state fin-wait-1 sport = :http
Netid  Recv-Q Send-Q  Local Address:Port                   Peer Address:Port 
  • -o, –options
    Show timer information.
  • STATE-FILTER
    All standard TCP states: established, syn-sent, syn-recv, fin-wait-1, fin-wait-2, time-wait, closed, close-wait, last-ack, listen and closing.
  • dport – Destination Port
  • sport – Source Port

Find all local processes connected to X server.

[root@localhost ~]$ ss -x src /tmp/.X11-unix/*
Netid  State      Recv-Q Send-Q Local Address:Port                  Peer Address:Port   
  • -x, –unix
    Display Unix domain sockets.

Linux command – smartctl (S.M.A.R.T. attributes)

$
0
0

關於 smartctl 使用,請參考 http://benjr.tw/95984

測試環境為 CentOS 7 x86_64

這邊討論如何透過 smartctl 去檢視硬碟的 S.M.A.R.T. attributes,可以透過下面兩個參數來檢視.

  • -a, –all

    -a 對於 ATA 硬碟參數等同 , ‘-H -i -c -A -l error -l selftest -l selective’
    -a 對於 SCSI 硬碟參數等同 , ‘-H -i -A -l error -l selftest’

  • -A, –attributes

    顯示硬碟製造商所提供的特定 SMART 屬性 (Attributes),屬性的編號從 1 到 253,關於這些屬性的名稱和 ID 請參考 https://en.wikipedia.org/wiki/S.M.A.R.T.#ATA_S.M.A.R.T._attributes

因為 S.M.A.R.T. attributes 是由硬碟製造商所提供的,所以比較早的硬碟可能就沒有任何資料.

[root@localhost ~]# smartctl -A /dev/sdb
smartctl 6.6 2017-11-05 r4594 [x86_64-linux-3.10.0-514.el7.x86_64] (local build)
Copyright (C) 2002-17, Bruce Allen, Christian Franke, www.smartmontools.org

=== START OF READ SMART DATA SECTION ===
Current Drive Temperature:     36 C
Drive Trip Temperature:        85 C

Manufactured in week 35 of year 2008
Specified cycle count over device lifetime:  50000
Accumulated start-stop cycles:  412
Elements in grown defect list: 0

Vendor (Seagate) cache information
  Blocks sent to initiator = 1070701389807616
[root@localhost ~]# smartctl -A /dev/sdb
smartctl 6.2 2013-07-26 r3841 [x86_64-linux-3.10.0-514.el7.x86_64] (local build)
Copyright (C) 2002-13, Bruce Allen, Christian Franke, www.smartmontools.org

=== START OF READ SMART DATA SECTION ===
SMART Attributes Data Structure revision number: 16
Vendor Specific SMART Attributes with Thresholds:
ID# ATTRIBUTE_NAME          FLAG     VALUE WORST THRESH TYPE      UPDATED  WHEN_FAILED RAW_VALUE
  1 Raw_Read_Error_Rate     0x002f   100   100   050    Pre-fail  Always       -       13
  5 Reallocated_Sector_Ct   0x0032   100   100   001    Old_age   Always       -       0
  9 Power_On_Hours          0x0032   100   100   001    Old_age   Always       -       1586
 12 Power_Cycle_Count       0x0032   100   100   001    Old_age   Always       -       554
170 Unknown_Attribute       0x0033   100   100   010    Pre-fail  Always       -       44
171 Unknown_Attribute       0x0032   100   100   001    Old_age   Always       -       0
172 Unknown_Attribute       0x0032   100   100   001    Old_age   Always       -       0
173 Unknown_Attribute       0x0033   100   100   000    Pre-fail  Always       -       39
174 Unknown_Attribute       0x0032   100   100   001    Old_age   Always       -       466
184 End-to-End_Error        0x0033   100   100   050    Pre-fail  Always       -       0
187 Reported_Uncorrect      0x0032   100   100   001    Old_age   Always       -       0
188 Command_Timeout         0x0032   100   100   001    Old_age   Always       -       1
194 Temperature_Celsius     0x0022   078   065   000    Old_age   Always       -       22 (Min/Max 14/35)
195 Hardware_ECC_Recovered  0x003a   100   100   001    Old_age   Always       -       1908
197 Current_Pending_Sector  0x0032   100   100   001    Old_age   Always       -       0
198 Offline_Uncorrectable   0x0030   100   100   001    Old_age   Offline      -       0
199 UDMA_CRC_Error_Count    0x0032   100   100   001    Old_age   Always       -       0
202 Unknown_SSD_Attribute   0x0018   100   100   001    Old_age   Offline      -       0
206 Unknown_SSD_Attribute   0x000e   100   100   001    Old_age   Always       -       0
247 Unknown_Attribute       0x0032   100   100   000    Old_age   Always       -       928166108
248 Unknown_Attribute       0x0032   100   100   000    Old_age   Always       -       21320209
  1. ID# & ATTRIBUTE_NAME
    屬性 編號與名稱從 1 到 253,關於這些屬性的名稱和 ID 請參考 https://en.wikipedia.org/wiki/S.M.A.R.T.#ATA_S.M.A.R.T._attributes
    裡面有幾項屬性是被列為嚴重( Critical )問題,需要特別檢視的.
    • 05 (0x05) – Reallocated Sectors Count
    • 10 (0x0A) – Spin Retry Count
    • 184 (0xB8) – End-to-End error / IOEDC
    • 187 (0xBB) – Reported Uncorrectable Errors
    • 188 (0xBC) – Command Timeout
    • 196 (0xC4) – Reallocation Event Count
    • 198 (0xC6) – (Offline) Uncorrectable Sector Count
    • 197 (0xC5) – Current Pending Sector Count
    • 201 (0xC9) – Soft Read Error Rate or TA Counter Detected
  2. FLAG
    ?
  3. VALUE
    範圍從 0 到 255,起始值大部分設定成為 100.
    • 0, 254, 以及 255 為保留使用.
    • 253 表示為 “Not Used Yet”
    • 1 表示為 worst case.
  4. WORST
    有記錄以來的最低值.
  5. THRESH
    VALUE 大部分起始值設定成為 100,1 表示為 worst case,通常達到 THRESH (Threshold) 就代表故障 (Failure) 了!
  6. TYPE
    • Pre-failure – 當 WORST(有記錄以來的最低值) 低於 THRESH (Threshold) ,系統會顯示該顆硬碟有可能故障.
    • Old age – 顯示該硬碟已經超出使用期限或是耗損次數.
  7. UPDATED
    資料更新時間
    • Always – 表示隨時都會更新資料.
    • Offline – 只有在離線測試執行時才會更新資料,關於 smartctl 測試請參考 http://benjr.tw/96015 .
  8. WHEN_FAILED
    通常是沒有數值的,如果不是空白,則表示總共運行的小時數(同 attribute 9 Power_On_Hours).
  9. RAW_VALUE
    屬性的原始數值.

那 NVME 的儲存裝置,是不是也可以透過 smartctl 來檢視資料呢!雖然在 smartctl 官網有提到 https://www.smartmontools.org/wiki/NVMe_Support 但透過 smartctl 看 nvme 所得到的資訊卻很不多,官網也建議使用 nvme 指令 (由 nvme-cli 套件提供) ,請參考 http://benjr.tw/98887 .

[root@localhost ~]# smartctl -A /dev/nvme0
smartctl 6.6 2017-11-05 r4594 [x86_64-linux-3.10.0-514.el7.x86_64] (local build)
Copyright (C) 2002-17, Bruce Allen, Christian Franke, www.smartmontools.org

=== START OF SMART DATA SECTION ===
Read NVMe SMART/Health Information failed: NVMe Status 0x04

Linux command – nvme

$
0
0

測試環境為 CentOS 7 x86_64

在 smartctl 官網有提到 https://www.smartmontools.org/wiki/NVMe_Support 可以透過它來看 nvme 的資訊.

SATA Express / NVMe
使用的是 PCI Express SSD 的硬碟裝置,透過 NVMe 的驅動程式並使用 PCI Express lanes 為介面,作為高性能和可擴展主機控制器接口設計,還針對了 PCI Express的固態硬盤的連接埠做了效能優化的處理.
NVMe 的設計一開始就針對 低延遲和 PCI Express 固態硬盤的並行性,並滿足現代的 CPU,平台和應用的並行性.和 AHCI 相比 NVMe 它的優點 如使用較少的階段的數據傳輸,更深入的命令列 (command queues)和更高效中斷處理 (interrupts processing)

SATA 與 NVME 的比較可以參考 http://benjr.tw/73607

[root@localhost ~]# smartctl -A /dev/nvme0
smartctl 6.6 2017-11-05 r4594 [x86_64-linux-3.10.0-514.el7.x86_64] (local build)
Copyright (C) 2002-17, Bruce Allen, Christian Franke, www.smartmontools.org
 
=== START OF SMART DATA SECTION ===
Read NVMe SMART/Health Information failed: NVMe Status 0x04

但實際用資訊卻不多,有網友建議使用新版本或是透過指令更新 smartctl 資料庫,要不然就直接使用指令 #nvme.

指令 smartctl

  1. 更新 smartctl 版本
    下載點為 https://sourceforge.net/projects/smartmontools/
    [root@localhost ~]$ tar zxvf smartmontools-6.6.tar.gz
    [root@localhost ~]$ cd smartmontools-6.6/
    [root@localhost smartmontools-6.6]$ ./configure
    [root@localhost smartmontools-6.6]$ make
    [root@localhost smartmontools-6.6]$ make install
    
  2. 更新 smartctl 資料庫
    [root@localhost ~]$ update-smart-drivedb
    /usr/local/share/smartmontools/drivedb.h updated from branches/RELEASE_6_6_DRIVEDB
    

指令 nvme

smartctl 官網也建議使用 nvme 指令 (由 nvme-cli 套件提供).

[root@localhost ~]$ yum install nvme-cli

nvme list – List all nvme controllers.

[root@localhost ~]$ [root@localhost ~]# nvme list
Node          SN                Model                Version  Namespace Usage               Format    FW Rev  
------------- ----------------- -------------------- -------- --------- ------------------- --------- --------
/dev/nvme0n1   BTPY71920HS4148D INTEL SSDPEKKA128G7  1.2      1         128.04GB/128.04GB   512B + 0B PSF119D

nvme smart-log – Retrieve Smart Log

[root@localhost ~]# nvme smart-log /dev/nvme0 
Smart Log for NVME device:nvme0 namespace-id:ffffffff
critical_warning                    : 0
temperature                         : 33 C
available_spare                     : 100%
available_spare_threshold           : 10%
percentage_used                     : 0%
data_units_read                     : 207,019
data_units_written                  : 357,912
host_read_commands                  : 3,823,035
host_write_commands                 : 5,463,129
controller_busy_time                : 78
power_cycles                        : 1,644
power_on_hours                      : 945
unsafe_shutdowns                    : 1,583
media_errors                        : 0
num_err_log_entries                 : 0
Warning Temperature Time            : 0
Critical Composite Temperature Time : 0
Temperature Sensor 1                : 0 C
Temperature Sensor 2                : 0 C
Temperature Sensor 3                : 0 C
Temperature Sensor 4                : 0 C
Temperature Sensor 5                : 0 C
Temperature Sensor 6                : 0 C
Temperature Sensor 7                : 0 C
Temperature Sensor 8                : 0 C

nvme error-log – Retrieve error logs

[root@localhost ~]# nvme error-log /dev/nvme0

Linux – cgroup & namespace

$
0
0

什麼是 cgroup ( Control Group) 和 Namespaces ( Name spaces ) ? 要先說什麼是 container ?

Container 與虛擬機類似,都是在原作業系統提供一個環境給另外一個作業系統來使用,虛擬機器 Virtual Machine 透過 VMM (Virtual Machine Monitor,也可以稱作 Hybervisor) 的方式來建立一個虛擬化的環境給虛擬機的作業系統來使用,而 Container 是在原作業系統中透過資源共享的方式,建立出一個獨立空間,這環境有自己的 file system, process 與 block I/O ,network.

傳統的 VMM 優點是所有的作業系統我們都可以模擬,但需要透過 VMM 效能會比較差一點,Container 只能使用在 Linux 同值性的作業系統下,透過資源共享,效能佳,也不會消耗過多的系統資源.

但 Container 要如何隔離主系統與 Containers 之間的存取? 與限制 Containers 使用的資源?
這就需要透過 cgroup & namespace 這兩項功能 (Linux 核心從 2.6.24 之後的版本內建了 Control Group 和 Namespaces ),

測試環境為 Ubuntu 16.04 x86_64 虛擬機.

Cgroup

Linux kernel 的 cgroups 可以針對 Container 下的資源(CPU , Memory , Block I/O , network , etc.)進行限制和優先順序.

下面兩個指令,可以清楚看到我們可以透過 Cgroup 去限制哪些資源.

root@ubuntu:~# mount -t cgroup
cgroup on /sys/fs/cgroup/systemd type cgroup (rw,nosuid,nodev,noexec,relatime,xattr,release_agent=/lib/systemd/systemd-cgroups-agent,name=systemd)
cgroup on /sys/fs/cgroup/blkio type cgroup (rw,nosuid,nodev,noexec,relatime,blkio)
cgroup on /sys/fs/cgroup/cpu,cpuacct type cgroup (rw,nosuid,nodev,noexec,relatime,cpu,cpuacct)
cgroup on /sys/fs/cgroup/cpuset type cgroup (rw,nosuid,nodev,noexec,relatime,cpuset)
cgroup on /sys/fs/cgroup/net_cls,net_prio type cgroup (rw,nosuid,nodev,noexec,relatime,net_cls,net_prio)
cgroup on /sys/fs/cgroup/memory type cgroup (rw,nosuid,nodev,noexec,relatime,memory)
cgroup on /sys/fs/cgroup/perf_event type cgroup (rw,nosuid,nodev,noexec,relatime,perf_event)
cgroup on /sys/fs/cgroup/freezer type cgroup (rw,nosuid,nodev,noexec,relatime,freezer)
cgroup on /sys/fs/cgroup/pids type cgroup (rw,nosuid,nodev,noexec,relatime,pids)
cgroup on /sys/fs/cgroup/hugetlb type cgroup (rw,nosuid,nodev,noexec,relatime,hugetlb)
cgroup on /sys/fs/cgroup/devices type cgroup (rw,nosuid,nodev,noexec,relatime,devices)
root@ubuntu:~# lssubsys  -m
cpuset /sys/fs/cgroup/cpuset
cpu,cpuacct /sys/fs/cgroup/cpu,cpuacct
blkio /sys/fs/cgroup/blkio
memory /sys/fs/cgroup/memory
devices /sys/fs/cgroup/devices
freezer /sys/fs/cgroup/freezer
net_cls,net_prio /sys/fs/cgroup/net_cls,net_prio
perf_event /sys/fs/cgroup/perf_event
hugetlb /sys/fs/cgroup/hugetlb
pids /sys/fs/cgroup/pids

範例:限制 CPU 資源

  1. 建立 group
    root@ubuntu:~# mkdir /sys/fs/cgroup/cpu/limitg1
    root@ubuntu:~# ll /sys/fs/cgroup/cpu/limitg1
    total 0
    drwxr-xr-x 2 root root 0 Dec 28 19:09 ./
    dr-xr-xr-x 4 root root 0 Dec 28 19:09 ../
    -rw-r--r-- 1 root root 0 Dec 28 19:09 cgroup.clone_children
    -rw-r--r-- 1 root root 0 Dec 28 19:09 cgroup.procs
    -r--r--r-- 1 root root 0 Dec 28 19:09 cpuacct.stat
    -rw-r--r-- 1 root root 0 Dec 28 19:09 cpuacct.usage
    -r--r--r-- 1 root root 0 Dec 28 19:09 cpuacct.usage_percpu
    -rw-r--r-- 1 root root 0 Dec 28 19:09 cpu.cfs_period_us
    -rw-r--r-- 1 root root 0 Dec 28 19:09 cpu.cfs_quota_us
    -rw-r--r-- 1 root root 0 Dec 28 19:09 cpu.shares
    -r--r--r-- 1 root root 0 Dec 28 19:09 cpu.stat
    -rw-r--r-- 1 root root 0 Dec 28 19:09 notify_on_release
    -rw-r--r-- 1 root root 0 Dec 28 19:09 tasks
    
  2. 限制特定 group 使用 20% CPU 的資源
    root@ubuntu:~# echo 20000 > /sys/fs/cgroup/cpu/limitg1/cpu.cfs_quota_us
    

    cpu.cfs_quota_us 值設定要參考 cpu.cfs_period_us 20000/100000 =20%

    root@ubuntu:~# cat /sys/fs/cgroup/cpu/limitg1/cpu.cfs_period_us
    100000
    root@ubuntu:~# cat /sys/fs/cgroup/cpu/limitg1/cpu.cfs_quota_us 
    20000
    
  3. 指派 process 到 group (limitg1)
    透過 #top 去觀察,這個 random.sh script (PID: 2262) 已經用掉大部分的 CPU 所有資源.
    root@ubuntu:~# cat random.sh
    #!/bin/bash
    while true
    do
     echo $RANDOM
    done
    root@ubuntu:~# ./random.sh
    
    top - 19:11:20 up 50 min,  3 users,  load average: 0.42, 0.16, 0.14
    Tasks: 215 total,   3 running, 212 sleeping,   0 stopped,   0 zombie
    %Cpu(s): 42.7 us, 54.0 sy,  0.0 ni,  0.0 id,  0.0 wa,  0.0 hi,  3.3 si,  0.0 st
    KiB Mem :   998228 total,    79544 free,   281580 used,   637104 buff/cache
    KiB Swap:  1046524 total,  1041148 free,     5376 used.   485620 avail Mem
    
       PID USER      PR  NI    VIRT    RES    SHR S %CPU %MEM     TIME+ COMMAND
      2262 root      20   0   12520    908    800 R 43.7  0.1   0:04.22 random.sh
    
    root@ubuntu:~# echo 2262 >> /sys/fs/cgroup/cpu/limitg1/tasks
    

    透過 #top 去觀察,可以看到 random.sh script 被限制最高只能使用 20% 的 CPU 資源.

    top - 19:15:00 up 53 min,  3 users,  load average: 0.76, 0.68, 0.37
    Tasks: 214 total,   3 running, 211 sleeping,   0 stopped,   0 zombie
    %Cpu(s): 15.5 us, 28.0 sy,  0.0 ni, 54.7 id,  0.0 wa,  0.0 hi,  1.7 si,  0.0 st
    KiB Mem :   998228 total,    79364 free,   281688 used,   637176 buff/cache
    KiB Swap:  1046524 total,  1041148 free,     5376 used.   485448 avail Mem 
    
       PID USER      PR  NI    VIRT    RES    SHR S %CPU %MEM     TIME+ COMMAND                
      2262 root      20   0   12520    908    800 R 20.2  0.1   1:07.79 random.sh                              
    

namespace

namespace 提供了 Container 彼此之間與作業系統是完全隔離且不受影響的, 提供 pid (Process ID) , network , IPC (interprocess communication) , mount , UTS (UNIX Time-sharing System) , User 等 namespace.

Ubuntu – LXC

Ubuntu 採用 LXC (Linux Containers) 作業系統層的虛擬化技術 (Operating system–level virtualization) 實現 Container 技術.

  1. LXC (Linux Containers) 基礎介紹 – http://benjr.tw/95955
  2. LXC (Linux Containers) 的使用 – http://benjr.tw/93708
  3. LXC 的網路架構 – http://benjr.tw/96074

Linux command – nvme format

$
0
0

SSD

傳統的 SSD 硬碟在做硬碟資料抹除 (security erase 可以讓硬碟回覆到原本的效能水準) 是透過 #hdparm .

首先要檢查硬碟是否有支援 security set 指令.

[root@benjr ~]# hdparm -I /dev/sdb 

要先設定 security password 才能執行 security erase.

[root@benjr ~]# hdparm --security-set-pass 1234 /dev/sdb
[root@benjr ~]# hdparm --security-erase 1234 /dev/sdb

NVME

但是 nvme 在做資料抹除時,需要使用 # nvme format 指令.

[root@benjr ~]# nvme format /dev/nvme0 --namespace-id=1 --ses=1 --pi=1

參數
-n nsid, –namespace-id=nsid
Send the format command for the specified nsid. This can be used to override the default value for either character device (0xffffffff) or the block device (result from NVME_IOCTL_ID).

-s ses, –ses=ses
Secure Erase Settings: This field specifies whether a secure erase should be performed as part of the format and the type of the secure erase operation. The erase applies to all user data, regardless of location (e.g., within an exposed LBA, within a cache, within deallocated LBAs, etc). Defaults to 0.

  • 0
    No secure erase operation requested
  • 1
    User Data Erase: All user data shall be erased,contents of the user data after the erase is indeterminate (e.g., the user data may be zero filled, one filled, etc). The controller may perform a cryptographic erase when a User Data Erase is requested if all user data is encrypted.
  • 2
    Cryptographic Erase: All user data shall be erased cryptographically. This is accomplished by deleting the encryption key.
  • 3–7
    Reserved.

PHP + Mysql

$
0
0

要如何透過 PHP 來讀取 Mysql (MariaDB) 的資料.

測試環境為 Ubuntu 16.04 x86_64 + Apache2 虛擬機 (IP: 172.16.15.130),設定請參考 http://benjr.tw/95861 .

先建立資料庫 user1Data 與 使用者 user1.

root@ubuntu:~# mysql -u root -p
Enter password: 
Welcome to the MariaDB monitor.  Commands end with ; or \g.
Your MariaDB connection id is 62
Server version: 10.0.31-MariaDB-0ubuntu0.16.04.2 Ubuntu 16.04

Copyright (c) 2000, 2017, Oracle, MariaDB Corporation Ab and others.

Type 'help;' or '\h' for help. Type '\c' to clear the current input statement.

MariaDB [(none)]> create database user1Data;
Query OK, 1 row affected (0.00 sec)

MariaDB [(none)]> CREATE USER user1@localhost IDENTIFIED BY '111111';
Query OK, 0 rows affected (0.01 sec)

MariaDB [(none)]> grant all privileges on user1Data.* to user1@localhost;
Query OK, 0 rows affected (0.00 sec)

MariaDB [(none)]> flush privileges;
Query OK, 0 rows affected (0.01 sec)

MariaDB [(none)]> exit;
Bye

使用新建立的使用者 user1 登入後建立 employee 資料表格,並寫入幾行資料.

root@ubuntu:~# mysql -u user1 -p
Enter password: 
Welcome to the MariaDB monitor.  Commands end with ; or \g.
Your MariaDB connection id is 63
Server version: 10.0.31-MariaDB-0ubuntu0.16.04.2 Ubuntu 16.04

Copyright (c) 2000, 2017, Oracle, MariaDB Corporation Ab and others.

Type 'help;' or '\h' for help. Type '\c' to clear the current input statement.

MariaDB [(none)]> show databases;
+--------------------+
| Database           |
+--------------------+
| information_schema |
| user1Data          |
+--------------------+
2 rows in set (0.00 sec)

MariaDB [(none)]> use user1Data;
Database changed
MariaDB [user1Data]> create table employee (Name char(20),Dept char(20),jobTitle char(20));
Query OK, 0 rows affected (0.04 sec)

MariaDB [user1Data]> DESCRIBE employee;
+----------+----------+------+-----+---------+-------+
| Field    | Type     | Null | Key | Default | Extra |
+----------+----------+------+-----+---------+-------+
| Name     | char(20) | YES  |     | NULL    |       |
| Dept     | char(20) | YES  |     | NULL    |       |
| jobTitle | char(20) | YES  |     | NULL    |       |
+----------+----------+------+-----+---------+-------+
3 rows in set (0.02 sec)

MariaDB [user1Data]> INSERT INTO employee VALUES ('Ben','Testing','Engineer');
Query OK, 1 row affected (0.00 sec)

MariaDB [user1Data]> INSERT INTO employee VALUES ('Afa','Power','Engineer');
Query OK, 1 row affected (0.01 sec)

MariaDB [user1Data]> SELECT * from employee;
+------+---------+----------+
| Name | Dept    | jobTitle |
+------+---------+----------+
| Ben  | Testing | Engineer |
| Afa  | Power   | Engineer |
+------+---------+----------+
2 rows in set (0.00 sec)

MariaDB [user1Data]> exit;
Bye

PHP 語法

root@ubuntu:~# cd /var/www/html
root@ubuntu:/var/www/html# vi query.php
<?php
    $dbhost = 'localhost';
    $dbuser = 'user1';
    $dbpass = '111111';
    $dbname = 'user1Data';
    $dbc = mysqli_connect($dbhost, $dbuser, $dbpass ,$dbname) or die('Error connecting to MySQL server');
    $query = "SELECT * from user1Data.employee";
    $result = mysqli_query($dbc, $query) or die('MySQL query error');
    echo 'TEST Results' . '<br />';
    while ($row = mysqli_fetch_array($result)) {
    echo $row['Name'] . ' ' . $row['Dept'] . ' ' . $row['jobTitle'] . '<br />';
    }
    echo 'Test Completed';    
mysqli_close($dbc);
?>

主要透過下面幾個與 SQL 函數庫,來獲取資料庫資料.

  1. mysqli_connect 使用參數:
    $dbhost – 如果你的 PHP 與 資料庫 在同一台伺服器時,可以直接使用 localhost ,不同時需要使用 IP 或是 Hostname (需注意使用者權限問題).
    $dbuser – 資料庫使用者名稱.
    $dbpass – 資料庫使用者密碼.
    $dbname – 資料庫名稱.
  2. mysqli_query 使用參數:
    $dbc – 透過 mysqli_connect 回傳的 $dbc 值.
    $query – SQL 語法 ,我用了查詢 “SELECT * from user1Data.employee” .
  3. mysqli_fetch_array 使用參數:
    需要透過 mysqli_query 回傳的 $result 值.
  4. mysqli_close 使用參數:
    需要透過 mysqli_connect 回傳的 $dbc 值.

執行結果:

SQL 語法 – select (初階1)

$
0
0

關於 Linux 下的 Mysql (MariaDB) 設定請參考 http://benjr.tw/12461

測試環境為 Ubuntu 16.04 x86_64 ,常用的 SQL SELECT 基礎查詢.

先建立一個資料庫 (testdb) , 與 tables (employee) 格式為 Name char(20), Dept char(20), jobTitle char(20) 各 20 個字元.

root@ubuntu:~# mysql -u root -p
MariaDB [(none)]> create database testdb;
Query OK, 1 row affected (0.00 sec)

MariaDB [(none)]> use testdb;
Database changed

MariaDB [testdb]> create table employee (Name char(20),Dept char(20),JobTitle char(20),Salary int);
Query OK, 0 rows affected (0.10 sec)

MariaDB [testdb]> DESCRIBE employee; 
+----------+----------+------+-----+---------+-------+
| Field    | Type     | Null | Key | Default | Extra |
+----------+----------+------+-----+---------+-------+
| Name     | char(20) | YES  |     | NULL    |       |
| Dept     | char(20) | YES  |     | NULL    |       |
| JobTitle | char(20) | YES  |     | NULL    |       |
| Salary   | int(11)  | YES  |     | NULL    |       |
+----------+----------+------+-----+---------+-------+
4 rows in set (0.01 sec)

MariaDB [testdb]> show tables;
+------------------+
| Tables_in_sbtest |
+------------------+
| employee         |
+------------------+
1 row in set (0.00 sec)

透過 INSERT 新增加了四筆資料.

MariaDB [testdb]> INSERT INTO employee VALUES ('Ben','Testing','Engineer','45000');
Query OK, 1 row affected (0.00 sec)

MariaDB [testdb]> INSERT INTO employee VALUES ('Afa','Power','Engineer','48000');
Query OK, 1 row affected (0.00 sec)

MariaDB [testdb]> INSERT INTO employee VALUES ('Boss','Testing','Manager','75000');
Query OK, 1 row affected (0.00 sec)

MariaDB [testdb]> INSERT INTO employee VALUES ('Cars','Testing','Senior Engineer','42000');
Query OK, 1 row affected (0.00 sec)

SELECT 可以接 FROM , DISTINCT , WHERE , ORDER BY , LIMIT 等組合來查詢資料庫內容.

FROM

MariaDB [testdb]> SELECT * from employee;
+------+---------+-----------------+--------+
| Name | Dept    | JobTitle        | Salary |
+------+---------+-----------------+--------+
| Ben  | Testing | Engineer        |  45000 |
| Afa  | Power   | Engineer        |  48000 |
| Boss | Testing | Manager         |  75000 |
| Cars | Testing | Senior Engineer |  42000 |
+------+---------+-----------------+--------+
4 rows in set (0.00 sec)
MariaDB [testdb]> SELECT Name,Salary from employee;
+------+--------+
| Name | Salary |
+------+--------+
| Ben  |  45000 |
| Afa  |  48000 |
| Boss |  75000 |
| Cars |  42000 |
+------+--------+
4 rows in set (0.00 sec)

DISTINCT

Select 特定欄位時可以選擇 顯示全部 All(*) 或是 DISTINCT 不重覆的資料.

MariaDB [testdb]> SELECT All JobTitle from employee;
+-----------------+
| JobTitle        |
+-----------------+
| Engineer        |
| Engineer        |
| Manager         |
| Senior Engineer |
+-----------------+
4 rows in set (0.00 sec)
MariaDB [testdb]> SELECT Distinct JobTitle from employee;
+-----------------+
| JobTitle        |
+-----------------+
| Engineer        |
| Manager         |
| Senior Engineer |
+-----------------+
3 rows in set (0.01 sec)

WHERE

SELECT "欄位" FROM "表格" WHERE "欄位" [比較條件]

透過 where 來篩選,還可以加上運算子來設定條件.

  1. = , <=> (等於)
    MariaDB [testdb]> SELECT * from employee where jobTitle='Engineer';
    +------+---------+----------+--------+
    | Name | Dept    | JobTitle | Salary |
    +------+---------+----------+--------+
    | Ben  | Testing | Engineer |  45000 |
    | Afa  | Power   | Engineer |  48000 |
    +------+---------+----------+--------+
    2 rows in set (0.01 sec)
    
    MariaDB [testdb]> SELECT * from employee where jobTitle <=> 'Engineer';
    +------+---------+----------+--------+
    | Name | Dept    | JobTitle | Salary |
    +------+---------+----------+--------+
    | Ben  | Testing | Engineer |  45000 |
    | Afa  | Power   | Engineer |  48000 |
    +------+---------+----------+--------+
    2 rows in set (0.00 sec)
    
  2. NOT , != (非,不等於)
    MariaDB [testdb]> SELECT * from employee where jobTitle!='Engineer';
    +------+---------+-----------------+--------+
    | Name | Dept    | JobTitle        | Salary |
    +------+---------+-----------------+--------+
    | Boss | Testing | Manager         |  75000 |
    | Cars | Testing | Senior Engineer |  42000 |
    +------+---------+-----------------+--------+
    2 rows in set (0.00 sec)
    
    MariaDB [testdb]> SELECT * from employee where NOT jobTitle='Engineer';
    +------+---------+-----------------+--------+
    | Name | Dept    | JobTitle        | Salary |
    +------+---------+-----------------+--------+
    | Boss | Testing | Manager         |  75000 |
    | Cars | Testing | Senior Engineer |  42000 |
    +------+---------+-----------------+--------+
    2 rows in set (0.00 sec)
    
  3. < , <= (小於,小於等於)
    MariaDB [testdb]> SELECT * from employee where Salary <= 50000;
    +------+---------+-----------------+--------+
    | Name | Dept    | JobTitle        | Salary |
    +------+---------+-----------------+--------+
    | Ben  | Testing | Engineer        |  45000 |
    | Afa  | Power   | Engineer        |  48000 |
    | Cars | Testing | Senior Engineer |  42000 |
    +------+---------+-----------------+--------+
    3 rows in set (0.01 sec)
    
  4. > , >= (大於,大於等於)
    MariaDB [testdb]> SELECT * from employee where Salary >= 50000;
    +------+---------+----------+--------+
    | Name | Dept    | JobTitle | Salary |
    +------+---------+----------+--------+
    | Boss | Testing | Manager  |  75000 |
    +------+---------+----------+--------+
    1 row in set (0.00 sec)
    
  5. && , AND (而且)
    AND 必需符合所有條件的資料.
    MariaDB [testdb]> SELECT * from employee where jobTitle='Engineer' AND Dept='Testing';
    +------+---------+----------+--------+
    | Name | Dept    | JobTitle | Salary |
    +------+---------+----------+--------+
    | Ben  | Testing | Engineer |  45000 |
    +------+---------+----------+--------+
    1 row in set (0.01 sec)
    
    MariaDB [testdb]> SELECT * from employee where jobTitle='Engineer' && Dept='Testing';
    +------+---------+----------+--------+
    | Name | Dept    | JobTitle | Salary |
    +------+---------+----------+--------+
    | Ben  | Testing | Engineer |  45000 |
    +------+---------+----------+--------+
    1 row in set (0.00 sec)
    
  6. || , OR (或)
    OR 任一符合條件的資料.
    MariaDB [testdb]> SELECT * from employee where jobTitle='Engineer' OR Dept='Testing';
    +------+---------+-----------------+--------+
    | Name | Dept    | JobTitle        | Salary |
    +------+---------+-----------------+--------+
    | Ben  | Testing | Engineer        |  45000 |
    | Afa  | Power   | Engineer        |  48000 |
    | Boss | Testing | Manager         |  75000 |
    | Cars | Testing | Senior Engineer |  42000 |
    +------+---------+-----------------+--------+
    4 rows in set (0.00 sec)
    
    MariaDB [testdb]> SELECT * from employee where jobTitle='Engineer' || Dept='Testing';
    +------+---------+-----------------+--------+
    | Name | Dept    | JobTitle        | Salary |
    +------+---------+-----------------+--------+
    | Ben  | Testing | Engineer        |  45000 |
    | Afa  | Power   | Engineer        |  48000 |
    | Boss | Testing | Manager         |  75000 |
    | Cars | Testing | Senior Engineer |  42000 |
    +------+---------+-----------------+--------+
    4 rows in set (0.01 sec)
    
  7. XOR (互斥)
    XOR 條件兩者有一個成立的資料,兩個條件成立或是皆不成立的資料不符合篩選.
    MariaDB [testdb]> SELECT * from employee where jobTitle='Engineer' XOR Dept='Testing';
    +------+---------+-----------------+--------+
    | Name | Dept    | JobTitle        | Salary |
    +------+---------+-----------------+--------+
    | Afa  | Power   | Engineer        |  48000 |
    | Boss | Testing | Manager         |  75000 |
    | Cars | Testing | Senior Engineer |  42000 |
    +------+---------+-----------------+--------+
    3 rows in set (0.01 sec)
    
  8. BETWEEN … AND … (區間比較)
    MariaDB [testdb]> SELECT * from employee where Salary between 45000 AND 50000;
    +------+---------+----------+--------+
    | Name | Dept    | JobTitle | Salary |
    +------+---------+----------+--------+
    | Ben  | Testing | Engineer |  45000 |
    | Afa  | Power   | Engineer |  48000 |
    +------+---------+----------+--------+
    2 rows in set (0.00 sec)
    
  9. IN (…) (多條件比較)
    IN 裡面的多條件,只要其中一個成立的資料.
    MariaDB [testdb]> SELECT * from employee where Name in('Ben','Afa');
    +------+---------+----------+--------+
    | Name | Dept    | JobTitle | Salary |
    +------+---------+----------+--------+
    | Ben  | Testing | Engineer |  45000 |
    | Afa  | Power   | Engineer |  48000 |
    +------+---------+----------+--------+
    2 rows in set (0.00 sec)
    
  10. IS (是),IS NOT (不是)
    如果是要找出資料內含有 NULL 的,需要使用 IS , IS NOT .
  11. LIKE (像)
    LIKE 通常會搭配 % ( 0個到多個任何字元) 或是 _ (任何一個字元).
    MariaDB [testdb]> SELECT * from employee where JobTitle LIKE '%Engineer%';
    +------+---------+-----------------+--------+
    | Name | Dept    | JobTitle        | Salary |
    +------+---------+-----------------+--------+
    | Ben  | Testing | Engineer        |  45000 |
    | Afa  | Power   | Engineer        |  48000 |
    | Cars | Testing | Senior Engineer |  42000 |
    +------+---------+-----------------+--------+
    3 rows in set (0.00 sec)
    

ORDER BY

ORDER BY 預設使用 ASC (Ascending) 從小到大,也可以設定從大到小 DESC (Descending).

MariaDB [testdb]> SELECT * from employee order by Salary;
+------+---------+-----------------+--------+
| Name | Dept    | JobTitle        | Salary |
+------+---------+-----------------+--------+
| Cars | Testing | Senior Engineer |  42000 |
| Ben  | Testing | Engineer        |  45000 |
| Afa  | Power   | Engineer        |  48000 |
| Boss | Testing | Manager         |  75000 |
+------+---------+-----------------+--------+
4 rows in set (0.01 sec)
MariaDB [testdb]> SELECT * from employee order by Salary DESC;
+------+---------+-----------------+--------+
| Name | Dept    | JobTitle        | Salary |
+------+---------+-----------------+--------+
| Boss | Testing | Manager         |  75000 |
| Afa  | Power   | Engineer        |  48000 |
| Ben  | Testing | Engineer        |  45000 |
| Cars | Testing | Senior Engineer |  42000 |
+------+---------+-----------------+--------+
4 rows in set (0.01 sec)

LIMIT

LIMIT 可以限制查詢回應的行數,使用方式有兩種 N (只需要前面 N 行的資料) 或是 N,M (只顯示從 N+1 到 M 行的資料).

MariaDB [testdb]> SELECT * from employee order by Salary ASC limit 1; 
+------+---------+-----------------+--------+
| Name | Dept    | JobTitle        | Salary |
+------+---------+-----------------+--------+
| Cars | Testing | Senior Engineer |  42000 |
+------+---------+-----------------+--------+
1 row in set (0.01 sec)
MariaDB [testdb]> SELECT * from employee order by Salary DESC limit 0,3; 
+------+---------+----------+--------+
| Name | Dept    | JobTitle | Salary |
+------+---------+----------+--------+
| Boss | Testing | Manager  |  75000 |
| Afa  | Power   | Engineer |  48000 |
| Ben  | Testing | Engineer |  45000 |
+------+---------+----------+--------+
3 rows in set (0.00 sec)

WordPress plug-in – PHP Everywhere

$
0
0

測試環境為 CentOS 7 x86_64

在 WordPress 預設是無法寫 PHP 的程式在文章裡頭,需要透過 plug-in ,這邊使用 PHP Everywhere – https://tw.wordpress.org/plugins/php-everywhere/

在 控制台/已安裝外掛 啟用 PHP Everywhere 之後,可以去設定 / PHP Everywhere 檢視以及說明.
能設定的部分只有 User role management (Who can modify the PHP in posts and pages) ,建議就限制只有 Administrator Only .

Widget

直接在 widget 寫入 php 程式碼即可.

<?php echo("Hello, World!"); ?>

Posts & Pages

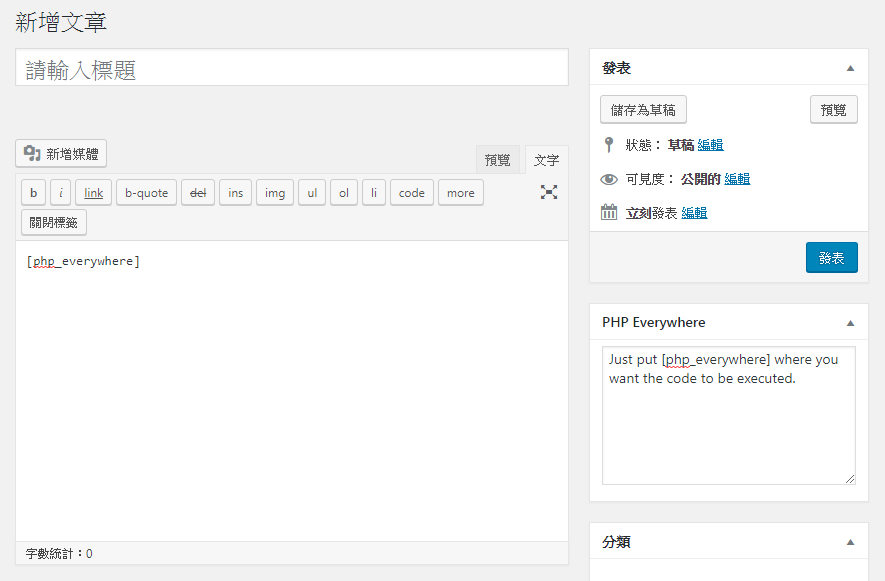
如圖所示,在編寫 Posts & Pages 時 PHP 寫在側邊欄,在文章插入 [PHP Everywhere] 是代表側邊欄的 PHP 程式碼.

Multiple PHP instances

有多段的 PHP 程式碼,可以透過下面的方式來表示,PHP 程式碼一樣寫在側邊欄.

<!--?php if($instance=="1") { echo("Number one!"); } if($instance=="2") { echo("Number two!"); } ?-->

在編寫 Posts & Pages 時插入不同段的 PHP 程式碼.
[php_everywhere instance=”1″]

[php_everywhere instance=”2″]

SQL 資料型態 TIMESTAMP

$
0
0

這邊來看一下 TIMESTAMP 這個資料型態.

測試環境為 Ubuntu16.04 x86_64 虛擬機.

建立一個有 timestamp 欄位的資料表 table ,預設值為 current_time stamp (日期時間函數,功能與 NOW 一樣,都是回傳目前系統的日期時間),on update CURRENT_TIMESTAMP 資料更新時,time stamp 也一同更新.

root@ubuntu:~# mysql -u root -p
Enter password: 
Welcome to the MariaDB monitor.  Commands end with ; or \g.
Your MariaDB connection id is 35
Server version: 10.0.31-MariaDB-0ubuntu0.16.04.2 Ubuntu 16.04

Copyright (c) 2000, 2017, Oracle, MariaDB Corporation Ab and others.

Type 'help;' or '\h' for help. Type '\c' to clear the current input statement.

MariaDB [(none)]> create database testdb;
Query OK, 1 row affected (0.01 sec)

MariaDB [(none)]> use testdb;
Database changed
MariaDB [testdb]> create table employee (Name char(20),ts timestamp);
Query OK, 0 rows affected (0.03 sec)

MariaDB [testdb]> DESCRIBE employee; 
+-------+-----------+------+-----+-------------------+-----------------------------+
| Field | Type      | Null | Key | Default           | Extra                       |
+-------+-----------+------+-----+-------------------+-----------------------------+
| Name  | char(20)  | YES  |     | NULL              |                             |
| ts    | timestamp | NO   |     | CURRENT_TIMESTAMP | on update CURRENT_TIMESTAMP |
+-------+-----------+------+-----+-------------------+-----------------------------+
2 rows in set (0.00 sec)

建立一筆新資料時,time stamp 會自動產生,值為目前日期+時間.

MariaDB [testdb]> INSERT INTO employee (Name) VALUES ('Ben');
Query OK, 1 row affected (0.01 sec)

MariaDB [testdb]> select * from employee;
+------+---------------------+
| Name | ts                  |
+------+---------------------+
| Ben  | 2018-01-05 01:15:13 |
+------+---------------------+
1 row in set (0.00 sec)

資料更新時,ts (time stamp) 也會更新.

MariaDB [testdb]> update employee set Name="Ben10" where Name="Ben";
Query OK, 1 row affected (0.02 sec)
Rows matched: 1  Changed: 1  Warnings: 0

MariaDB [testdb]> select * from employee;
+-------+---------------------+
| Name  | ts                  |
+-------+---------------------+
| Ben10 | 2018-01-07 23:48:16 |
+-------+---------------------+
1 row in set (0.01 sec)

如果不希望更新時把 ts(time stamp) 也同步更新,可以使用 alter 把 on update CURRENT_TIMESTAMP 移除.

MariaDB [testdb]> alter table employee change column ts ts timestamp default CURRENT_TIMESTAMP;
Query OK, 0 rows affected (0.00 sec)
Records: 0  Duplicates: 0  Warnings: 0

MariaDB [testdb]> describe employee;
+-------+-----------+------+-----+-------------------+-------+
| Field | Type      | Null | Key | Default           | Extra |
+-------+-----------+------+-----+-------------------+-------+
| Name  | char(30)  | YES  |     | NULL              |       |
| ts    | timestamp | NO   |     | CURRENT_TIMESTAMP |       |
+-------+-----------+------+-----+-------------------+-------+
2 rows in set (0.00 sec)

恢復一樣用 alter 修改.

MariaDB [testdb]> alter table employee change column ts ts timestamp default CURRENT_TIMESTAMP ON UPDATE CURRENT_TIMESTAMP;
Query OK, 0 rows affected (0.00 sec)
Records: 0  Duplicates: 0  Warnings: 0

MariaDB [testdb]> describe employee;
+-------+-----------+------+-----+-------------------+-----------------------------+
| Field | Type      | Null | Key | Default           | Extra                       |
+-------+-----------+------+-----+-------------------+-----------------------------+
| Name  | char(30)  | YES  |     | NULL              |                             |
| ts    | timestamp | NO   |     | CURRENT_TIMESTAMP | on update CURRENT_TIMESTAMP |
+-------+-----------+------+-----+-------------------+-----------------------------+
2 rows in set (0.01 sec)

其他與日期與時間相關的資料型態

Data Type “Zero” Value
DATE ‘0000-00-00’
TIME ’00:00:00′
DATETIME ‘0000-00-00 00:00:00’
TIMESTAMP ‘0000-00-00 00:00:00’
YEAR 0000

與日期與時間相關的函式:
CURDATE() – 回傳目前日期.
CURTIME() – 回傳目前時間.

更多關於 日期與時間的函數請參考 https://dev.mysql.com/doc/refman/5.5/en/date-and-time-functions.html

SQL 自訂函數 (數值轉單位字串)

$
0
0

測試環境為 Ubuntu16.04 x86_64 虛擬機.

當 SQL 函數 (Function) 沒有符合我們的需求時,可以自訂函數 (Function) 設定格式如下:

CREATE
    [DEFINER = { user | CURRENT_USER }]
    FUNCTION sp_name ([func_parameter[,...]])
    RETURNS type
    [characteristic ...] routine_body

直接來看一個範例,在計算機系統關於容量,大小會透過簡寫的方式來表示,自訂一個函數 format_bytes ,能將一般數值轉換成帶有單位的字串.
參考 https://github.com/mysql/mysql-sys/blob/master/functions/format_bytes.sql 範例.

  • KB (kilo bytes ,210)
  • MB (mega bytes ,220)
  • GB (giga bytes ,230)
  • TB (tera bytes ,240)
root@ubuntu:~# mysql -u root -p
Enter password: 
Welcome to the MariaDB monitor.  Commands end with ; or \g.
Your MariaDB connection id is 35
Server version: 10.0.31-MariaDB-0ubuntu0.16.04.2 Ubuntu 16.04

Copyright (c) 2000, 2017, Oracle, MariaDB Corporation Ab and others.

Type 'help;' or '\h' for help. Type '\c' to clear the current input statement.

MariaDB [(none)]> use testdb;
Reading table information for completion of table and column names
You can turn off this feature to get a quicker startup with -A

Database changed

先確認之前沒有定義過 format_bytes 這個 FUNCTION,有的話移除.

MariaDB [testdb]> DROP FUNCTION IF EXISTS format_bytes;
Query OK, 0 rows affected (0.01 sec)

自訂函數 format_bytes 主程式.

MariaDB [testdb]> DELIMITER //
MariaDB [testdb]> CREATE FUNCTION format_bytes (bytes TEXT)
    -> RETURNS TEXT
    -> BEGIN
    ->  IF bytes IS NULL THEN RETURN NULL;
    ->   ELSEIF bytes >= 1099511627776 THEN RETURN CONCAT(ROUND(bytes / 1099511627776, 2), ' TB');
    ->   ELSEIF bytes >= 1073741824 THEN RETURN CONCAT(ROUND(bytes / 1073741824, 2), ' GB');
    ->   ELSEIF bytes >= 1048576 THEN RETURN CONCAT(ROUND(bytes / 1048576, 2), ' MB');
    ->   ELSEIF bytes >= 1024 THEN RETURN CONCAT(ROUND(bytes / 1024, 2), ' KB');
    ->   ELSE RETURN CONCAT(ROUND(bytes, 0), ' bytes');
    -> END IF;
    -> END//
Query OK, 0 rows affected (0.00 sec)

MariaDB [testdb]> DELIMITER ;
  • DELIMITER // //
    mysql 透過分號 “;” 來表示分隔(一個敘述完成),但函數裡面可能會有多個 分隔,這時候可以使用 DELIMITER // … // ,來表示裡面是一整個敘述.
  • CREATE FUNCTION format_bytes (bytes TEXT)
    建立一個函數,須包含函數名稱與傳入值.
  • RETURNS TEXT
    回傳值.
  • BEGIN END
    函數程式宣告必須包含在裡面.
  • IF ELSEIF END IF
    IF search_condition THEN statement_list
        [ELSEIF search_condition THEN statement_list] ...
        [ELSE statement_list]
    END IF
    

自訂 format_bytes 函數裡面有用到兩個系統預設函數.

  • CONCAT
    將兩個或更多個表達式連接在一起.
  • ROUND
    取小數點,四捨五入.
    MariaDB [(none)]> SELECT ROUND(-1.23,1);
    +----------------+
    | ROUND(-1.23,1) |
    +----------------+
    |           -1.2 |
    +----------------+
    1 row in set (0.00 sec)
    
    MariaDB [(none)]> SELECT ROUND(-1.25,1);
    +----------------+
    | ROUND(-1.25,1) |
    +----------------+
    |           -1.3 |
    +----------------+
    1 row in set (0.00 sec)
    

來試試看這個自訂的 format_bytes 函數執行結果.

MariaDB [testdb]> SELECT format_bytes(24593485034234) AS size;
+-----------+
| size      |
+-----------+
| 22.37 TiB |
+-----------+
1 row in set (0.00 sec)

SQL 自訂函數 (單位字串轉數值)

$
0
0

測試環境為 Ubuntu16.04 x86_64 虛擬機.

當 SQL 函數 (Function) 沒有符合我們的需求時,可以自訂函數 (Function) 設定格式如下:

CREATE
    [DEFINER = { user | CURRENT_USER }]
    FUNCTION sp_name ([func_parameter[,...]])
    RETURNS type
    [characteristic ...] routine_body

直接來看一個範例,在計算機系統關於容量,大小會透過簡寫的方式來表示,自訂一個函數 convert_bytes ,能將帶有單位的字串轉換成一般數值.

  • KB (kilo bytes ,210)
  • MB (mega bytes ,220)
  • GB (giga bytes ,230)
  • TB (tera bytes ,240)
root@ubuntu:~# mysql -u root -p
Enter password: 
Welcome to the MariaDB monitor.  Commands end with ; or \g.
Your MariaDB connection id is 35
Server version: 10.0.31-MariaDB-0ubuntu0.16.04.2 Ubuntu 16.04

Copyright (c) 2000, 2017, Oracle, MariaDB Corporation Ab and others.

Type 'help;' or '\h' for help. Type '\c' to clear the current input statement.

MariaDB [(none)]> use testdb;
Reading table information for completion of table and column names
You can turn off this feature to get a quicker startup with -A

Database changed

先確認之前沒有定義過 convert_bytes 這個 FUNCTION,有的話移除.

MariaDB [testdb]> DELIMITER //
MariaDB [testdb]> CREATE FUNCTION convert_bytes (bytes TEXT)
    -> RETURNS DOUBLE
    -> BEGIN
    ->    IF bytes IS NULL THEN RETURN 0;
    ->    ELSEIF locate('K',bytes)!=0 THEN RETURN CONVERT(TRIM(TRAILING 'KB/s' FROM bytes)*1024 , DOUBLE);
    ->    ELSEIF locate('Ki',bytes)!=0 THEN RETURN CONVERT(TRIM(TRAILING 'KiB/s' FROM bytes)*1024 , DOUBLE);
    ->    ELSEIF locate('M',bytes)!=0 THEN RETURN CONVERT(TRIM(TRAILING 'MB/s' FROM bytes)*1048576 , DOUBLE);
    ->    ELSEIF locate('Mi',bytes)!=0 THEN RETURN CONVERT(TRIM(TRAILING 'MiB/s' FROM bytes)*1048576 , DOUBLE);
    ->    ELSEIF locate('G',bytes)!=0 THEN RETURN CONVERT(TRIM(TRAILING 'GB/s' FROM bytes)*1073741824 , DOUBLE);
    ->    ELSEIF locate('Gi',bytes)!=0 THEN RETURN CONVERT(TRIM(TRAILING 'GiB/s' FROM bytes)*1073741824 , DOUBLE);
    ->    ELSEIF locate('T',bytes)!=0 THEN RETURN CONVERT(TRIM(TRAILING 'GB/s' FROM bytes)*1099511627776 , DOUBLE);
    ->    ELSEIF locate('Ti',bytes)!=0 THEN RETURN CONVERT(TRIM(TRAILING 'GiB/s' FROM bytes)*1099511627776 , DOUBLE);
    ->    ELSE RETURN CONVERT(TRIM(TRAILING 'B/s' FROM bytes) , DOUBLE);
    -> END IF;
    -> END//
Query OK, 0 rows affected (0.00 sec)

MariaDB [testdb]> DELIMITER ;
  • DELIMITER // //
    mysql 透過分號 “;” 來表示分隔(一個敘述完成),但函數裡面可能會有多個 分隔,這時候可以使用 DELIMITER // … // ,來表示裡面是一整個敘述.
  • CREATE FUNCTION convert_bytes (bytes TEXT)
    建立一個函數,須包含函數名稱與傳入值.
  • RETURNS TEXT
    回傳值.
  • BEGIN END
    函數程式宣告必須包含在裡面.
  • IF ELSEIF END IF
    IF search_condition THEN statement_list
        [ELSEIF search_condition THEN statement_list] ...
        [ELSE statement_list]
    END IF
    

自訂 convert_bytes 函數裡面有用到兩個系統預設函數.

  • locate
    檢視字串裡面是否有要搜尋的字 https://dev.mysql.com/doc/refman/5.7/en/string-functions.html#function_locate
    LOCATE(substr,str), LOCATE(substr,str,pos)
    
    mysql> SELECT LOCATE('bar', 'foobarbar');
            -> 4
    mysql> SELECT LOCATE('xbar', 'foobar');
            -> 0
    mysql> SELECT LOCATE('bar', 'foobarbar', 5);
            -> 7
    
  • trim
    移除特定字串 https://dev.mysql.com/doc/refman/5.7/en/string-functions.html#function_trim
    TRIM([{BOTH | LEADING | TRAILING} [remstr] FROM] str), TRIM([remstr FROM] str)
    
    mysql> SELECT TRIM('  bar   ');
            -> 'bar'
    mysql> SELECT TRIM(LEADING 'x' FROM 'xxxbarxxx');
            -> 'barxxx'
    mysql> SELECT TRIM(BOTH 'x' FROM 'xxxbarxxx');
            -> 'bar'
    mysql> SELECT TRIM(TRAILING 'xyz' FROM 'barxxyz');
            -> 'barx'
    
  • CONVERT
    資料型別作轉換 https://dev.mysql.com/doc/refman/5.7/en/cast-functions.html#function_convert.
    CONVERT(expr,type), CONVERT(expr USING transcoding_name)
    

來試試看這個自訂的 convert_bytes 函數執行結果.

MariaDB [testdb]> SELECT convert_bytes ('12.3TiB/s') AS size;
+------------------+
| size             |
+------------------+
| 13523993021644.8 |
+------------------+
1 row in set (0.00 sec)

Linux Disk Module

$
0
0

Linux 下要如何知道這一顆硬碟使用什麼模組 Module,有下面幾種方式來確認.

測試環境為 Ubuntu 16.04 x86_64 虛擬機.

lspci

root@ubuntu:~# lspci -v
...
00:10.0 SCSI storage controller: LSI Logic / Symbios Logic 53c1030 PCI-X Fusion-MPT Dual Ultra320 SCSI (rev 01)
...
root@ubuntu:~# lspci -s 00:10.0 -v
00:10.0 SCSI storage controller: LSI Logic / Symbios Logic 53c1030 PCI-X Fusion-MPT Dual Ultra320 SCSI (rev 01)
	Subsystem: VMware LSI Logic Parallel SCSI Controller
	Flags: bus master, medium devsel, latency 64, IRQ 17
	I/O ports at 1400 [size=256]
	Memory at feba0000 (64-bit, non-prefetchable) [size=128K]
	Memory at febc0000 (64-bit, non-prefetchable) [size=128K]
	[virtual] Expansion ROM at c0008000 [disabled] [size=16K]
	Capabilities: [f8] PCI Advanced Features
	Kernel driver in use: mptspi
	Kernel modules: mptspi

透過指令 # lspci -v 就可以查出 SCSI storage controller 的 Kernel driver 是 mptspi ,但是還是不能很直覺的查出哪一顆硬碟對應哪一個模組.

lshw

root@ubuntu:~# apt install lshw
root@ubuntu:~# lshw -class storage
  *-scsi
       description: SCSI storage controller
       product: 53c1030 PCI-X Fusion-MPT Dual Ultra320 SCSI
       vendor: LSI Logic / Symbios Logic
       physical id: 10
       bus info: pci@0000:00:10.0
       logical name: scsi2
       version: 01
       width: 64 bits
       clock: 33MHz
       capabilities: scsi bus_master cap_list rom scsi-host
       configuration: driver=mptspi latency=64 maxlatency=255 mingnt=6
       resources: irq:17 ioport:1400(size=256) memory:feba0000-febbffff memory:febc0000-febdffff memory:c0008000-c000bfff

透過指令 # lshw -class storage 就可以查出 SCSI storage controller 的 configuration: driver 是 mptspi ,但是還是不能很直覺的查出哪一顆硬碟對應哪一個模組.

hwinfo

root@ubuntu:~# apt install hwinfo
root@ubuntu:~# hwinfo --block
55: SCSI 200.0: 10600 Disk                                      
  [Created at block.245]
  Unique ID: R7kM.nTPZhtpisM9
  Parent ID: 37TO.741NuwlerHD
  SysFS ID: /class/block/sda
  SysFS BusID: 2:0:0:0
  SysFS Device Link: /devices/pci0000:00/0000:00:10.0/host2/target2:0:0/2:0:0:0
  Hardware Class: disk
  Model: "VMware Virtual S"
  Vendor: "VMware,"
  Device: "VMware Virtual S"
  Revision: "1.0"
  Driver: "mptspi", "sd"
  Driver Modules: "mptspi"
  Device File: /dev/sda (/dev/sg0)
  Device Files: /dev/sda, /dev/disk/by-path/pci-0000:00:10.0-scsi-0:0:0:0
  Device Number: block 8:0-8:15 (char 21:0)
  BIOS id: 0x80
  Geometry (Logical): CHS 2610/255/63
  Size: 41943040 sectors a 512 bytes
  Capacity: 20 GB (21474836480 bytes)
  Config Status: cfg=new, avail=yes, need=no, active=unknown
  Attached to: #14 (SCSI storage controller)

透過指令 # hwinfo –block 就可以查出 SCSI 200.0: 10600 Disk 的 Driver Modules: 是 mptspi ,而且在 SysFS ID 與 Device File 有顯示這是哪一顆硬碟.

udevadm

root@ubuntu:~# udevadm info -a -n /dev/sda

Udevadm info starts with the device specified by the devpath and then
walks up the chain of parent devices. It prints for every device
found, all possible attributes in the udev rules key format.
A rule to match, can be composed by the attributes of the device
and the attributes from one single parent device.

  looking at device '/devices/pci0000:00/0000:00:10.0/host2/target2:0:0/2:0:0:0/block/sda':
    KERNEL=="sda"
    SUBSYSTEM=="block"
    DRIVER==""
    ATTR{alignment_offset}=="0"
    ATTR{capability}=="50"
    ATTR{discard_alignment}=="0"
    ATTR{events}==""
    ATTR{events_async}==""
    ATTR{events_poll_msecs}=="-1"
    ATTR{ext_range}=="256"
    ATTR{inflight}=="       0        0"
    ATTR{range}=="16"
    ATTR{removable}=="0"
    ATTR{ro}=="0"
    ATTR{size}=="41943040"
    ATTR{stat}=="   93942       57  2077938    64760     5006    14944   770728    84672        0    37372   149132"

  looking at parent device '/devices/pci0000:00/0000:00:10.0/host2/target2:0:0/2:0:0:0':
    KERNELS=="2:0:0:0"
    SUBSYSTEMS=="scsi"
    DRIVERS=="sd"
    ATTRS{device_blocked}=="0"
    ATTRS{device_busy}=="0"
    ATTRS{dh_state}=="detached"
    ATTRS{eh_timeout}=="10"
    ATTRS{evt_capacity_change_reported}=="0"
    ATTRS{evt_inquiry_change_reported}=="0"
    ATTRS{evt_lun_change_reported}=="0"
    ATTRS{evt_media_change}=="0"
    ATTRS{evt_mode_parameter_change_reported}=="0"
    ATTRS{evt_soft_threshold_reached}=="0"
    ATTRS{inquiry}==""
    ATTRS{iocounterbits}=="32"
    ATTRS{iodone_cnt}=="0x182e7"
    ATTRS{ioerr_cnt}=="0x6"
    ATTRS{iorequest_cnt}=="0x182e7"
    ATTRS{model}=="VMware Virtual S"
    ATTRS{queue_depth}=="32"
    ATTRS{queue_ramp_up_period}=="120000"
    ATTRS{queue_type}=="simple"
    ATTRS{rev}=="1.0 "
    ATTRS{scsi_level}=="3"
    ATTRS{state}=="running"
    ATTRS{timeout}=="30"
    ATTRS{type}=="0"
    ATTRS{vendor}=="VMware, "

  looking at parent device '/devices/pci0000:00/0000:00:10.0/host2/target2:0:0':
    KERNELS=="target2:0:0"
    SUBSYSTEMS=="scsi"
    DRIVERS==""

  looking at parent device '/devices/pci0000:00/0000:00:10.0/host2':
    KERNELS=="host2"
    SUBSYSTEMS=="scsi"
    DRIVERS==""

  looking at parent device '/devices/pci0000:00/0000:00:10.0':
    KERNELS=="0000:00:10.0"
    SUBSYSTEMS=="pci"
    DRIVERS=="mptspi"
    ATTRS{broken_parity_status}=="0"
    ATTRS{class}=="0x010000"
    ATTRS{config}==""
    ATTRS{consistent_dma_mask_bits}=="32"
    ATTRS{d3cold_allowed}=="0"
    ATTRS{device}=="0x0030"
    ATTRS{dma_mask_bits}=="32"
    ATTRS{driver_override}=="(null)"
    ATTRS{enable}=="1"
    ATTRS{irq}=="17"
    ATTRS{local_cpulist}=="0"
    ATTRS{local_cpus}=="00000000,00000000,00000000,00000001"
    ATTRS{msi_bus}=="1"
    ATTRS{numa_node}=="-1"
    ATTRS{subsystem_device}=="0x1976"
    ATTRS{subsystem_vendor}=="0x15ad"
    ATTRS{vendor}=="0x1000"

  looking at parent device '/devices/pci0000:00':
    KERNELS=="pci0000:00"
    SUBSYSTEMS==""
    DRIVERS==""

#udevadm 的使用更直覺,可以直接指定硬碟,在 DRIVERS 顯示為 mptspi.

/sys

如果你的環境都沒有上述的工具,透過檢視 /sys 也可以查出硬碟使用了什麼模組 Module.

root@ubuntu:~# ll /sys/block/sda
lrwxrwxrwx 1 root root 0 Jan 15 22:57 /sys/block/sda -> ../devices/pci0000:00/0000:00:10.0/host2/target2:0:0/2:0:0:0/block/sda/
root@ubuntu:~# find /sys|grep -i drivers|grep 0000:00:10.0
/sys/bus/pci/drivers/mptspi/0000:00:10.0

關於 /sys 目錄 (從 2.6 核心開始硬體的系統資訊以更階層式目錄的架構來存放)可以參考 http://benjr.tw/20857

Viewing all 930 articles
Browse latest View live